
Objectives
• Identify the deployment options for Command View EVA
• Describe the Command View EVA GUI functionality changes
• List storage system scripting utility enhancements
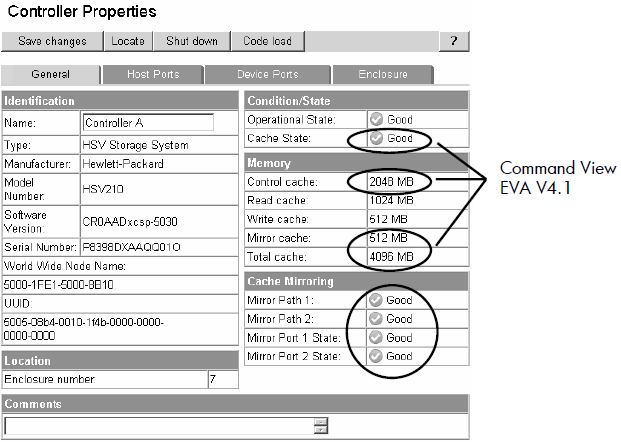
Controller attributes:
New attributes displayed for Controller Properties
• Two mirror paths
• Two mirror states
• Cache breakdown (Command View EVA V4.1)
• Three temperature sensors
• One average temperature display
• One voltage indicator
• Battery life predictions
• Four cache battery modules with two states for each: charger and battery.
All cache is now reported through this and System properties pages. Definitions are as follows:
• Control cache — the amount of memory available to store and execute controller commands in megabytes (policy memory).
• Read cache — The capacity of the read cache memory in megabytes.
• Write cache — The capacity of the write cache memory in megabytes.
• Mirror cache — The capacity of the mirror cache memory in megabytes.
• Total cache — The total capacity of the controller memory (cache and policy) in megabytes.

Additional controller host ports and host port type
Ports are displayed based on model of controller
• HSV200 — two host ports
• HSV210 — four host ports
Displayed in Controller Properties page, Host Ports tab
• EVA 3000/5000 series firmware only supports switched fabric host port connections
• EVA 4000/6000/8000 series products offer both switched and loop connections

Port loop position attribute
Sequential loop position of all controller and disk drive nodes is now displayed
• Shown in two places in the GUI
– Controller Properties page, Device Ports tab
– Drive Enclosure Bay Properties page, Disk Drive tab
 Loop ID: The ID of the controller on this loop, in hexadecimal format. Example: 7C.
Operational State: If the disk device port Operational State is failed, an Enable Port Pair button appears. After you fix the port problem, click the button to re-enable the port. See operational states.
ALPA: Arbitrated Loop Physical Address, in hexadecimal format. The lower the ALPA number, the higher the arbitration priority. Example: 02.
Loop Position: The sequential physical position of the port within the arbitrated loop cabling.
System options
– Configure event notification button
– Configure host notification button
– Set system operational policies button
– Set time options button
– Shut down button
– Uninitualize button

Three-phase snapclones
• Operations that support three-phase snapclone
– Creating an empty container from scratch
– Converting a normal virtual disk into a container
– Creating a snapclone using a preallocated container
– Deleting a container
– Displaying a container in the tree
– Displaying a container’s property page
• These operations are conditionalized to prevent improper actions in certain situations
– Example: Cannot create container if not enough space in disk group
• Existing virtual disk events are used with the new actions and the container object
Notes:
• You cannot create a container if there is not enough space in disk group
• The virtual disk cannot be converted if it has been presented or if it is a virtual disk with snapshots or with snapclones in progress, or is in process of being deleted.
• You cannot delete a container if a delete is already in progress. The container properties always display if it exists.
When you create a snapclone (a copy of a virtual disk), the first step is to allocate the same amount of space as the source virtual disk for the copy. Depending on the size of the source virtual disk, the space allocation may take several minutes to complete. However, you can allocate the required space before you create a snapclone, using a container, which is an empty virtual disk. Using this method is called creating a preallocated snapclone.
Creating a pre-allocated snapclone requires the following steps:
• Create the container.
• Clear the write cache.
• Attach the container to the source virtual disk.
When you create a container, you assign a name to it, select a disk group, and select a VRAID level and size. That space is then reserved until you are ready to create the snapclone. You can create multiple containers to have ready when you need them. Clearing the write cache means that you set the cache policy to "write-through" when you are ready to create the snapclone. This ensures that the controller writes data to both the cache and the physical disk while the host is writing data to the virtual disk. When you attach the container, you are copying the data from the source virtual disk to the container.
First step is to create a container
• Container can be in any disk group, even different from source virtual disk
• The container redundancy and disk group fixes those attributes for the snapclone
Notes: The initial understanding was that the selected container and the active virtual disk needed to be in the same disk group. This is a snapshot restriction (no support in Command View EVA V4.X) and not a snapclone restriction.

Creating the snapclone
• After selection of container, you get prompt for change of the write cache setting
• If not in write-through, cancel, change to write-through, and create the snapclone
 Changing source virtual disk write cache policy to write-through
 Last step:
Redundancy (not shown here) and disk group are determined by the container redundancy and location

Snapshot redundancy limitations
• Redundancy level of a snapshot depends on the parent virtual disk redundancy
• Snapshot must be an equal or lesser redundant VRAID type than the parent
– VRAID1 parent, valid snaps are VRAID1, VRAID5, and VRAID0
– VRAID5 parent, valid snaps are VRAID5 and VRAID0
– VRAID0 parent, valid snaps are VRAID0
• All snapshots of the same parent must be of the same VRAID level
– Example: For a VRAID5 parent, all snapshots must be VRAID5 or all snapshots must be VRAID0
• Command View EVA enforces the rules
• VRAID5 source virtual disk allows only VRAID5 or VRAID0 snapshots

Integrated logging facility data
• Limitation on first generation EVA
– Integrated logging facility (ILF) logging only on an ungrouped disk
– Drive should be new — never been used on an EVA, therefore no metadata
• Second generation EVA
– New Field Service page allows you to save ILF data as a file on the management server
• Because of long upload time, restrict the size of the ILF disks
• 36GB is maximum, but smaller (9–18GB) is better
– Storage system can be initialized or not
– If using a drive, same limitations as first generation EVA
Go to https://hostname:2381/command_view_eva/fieldservice Select the storage system, click Save ILF Log File.
• Identify the deployment options for Command View EVA
• Describe the Command View EVA GUI functionality changes
• List storage system scripting utility enhancements
Controller attributes:
New attributes displayed for Controller Properties
• Two mirror paths
• Two mirror states
• Cache breakdown (Command View EVA V4.1)
• Three temperature sensors
• One average temperature display
• One voltage indicator
• Battery life predictions
• Four cache battery modules with two states for each: charger and battery.
All cache is now reported through this and System properties pages. Definitions are as follows:
• Control cache — the amount of memory available to store and execute controller commands in megabytes (policy memory).
• Read cache — The capacity of the read cache memory in megabytes.
• Write cache — The capacity of the write cache memory in megabytes.
• Mirror cache — The capacity of the mirror cache memory in megabytes.
• Total cache — The total capacity of the controller memory (cache and policy) in megabytes.
Additional controller host ports and host port type
Ports are displayed based on model of controller
• HSV200 — two host ports
• HSV210 — four host ports
Displayed in Controller Properties page, Host Ports tab
• EVA 3000/5000 series firmware only supports switched fabric host port connections
• EVA 4000/6000/8000 series products offer both switched and loop connections
Port loop position attribute
Sequential loop position of all controller and disk drive nodes is now displayed
• Shown in two places in the GUI
– Controller Properties page, Device Ports tab
– Drive Enclosure Bay Properties page, Disk Drive tab
Operational State: If the disk device port Operational State is failed, an Enable Port Pair button appears. After you fix the port problem, click the button to re-enable the port. See operational states.
ALPA: Arbitrated Loop Physical Address, in hexadecimal format. The lower the ALPA number, the higher the arbitration priority. Example: 02.
Loop Position: The sequential physical position of the port within the arbitrated loop cabling.
System options
– Configure event notification button
– Configure host notification button
– Set system operational policies button
– Set time options button
– Shut down button
– Uninitualize button
Three-phase snapclones
• Operations that support three-phase snapclone
– Creating an empty container from scratch
– Converting a normal virtual disk into a container
– Creating a snapclone using a preallocated container
– Deleting a container
– Displaying a container in the tree
– Displaying a container’s property page
• These operations are conditionalized to prevent improper actions in certain situations
– Example: Cannot create container if not enough space in disk group
• Existing virtual disk events are used with the new actions and the container object
Notes:
• You cannot create a container if there is not enough space in disk group
• The virtual disk cannot be converted if it has been presented or if it is a virtual disk with snapshots or with snapclones in progress, or is in process of being deleted.
• You cannot delete a container if a delete is already in progress. The container properties always display if it exists.
When you create a snapclone (a copy of a virtual disk), the first step is to allocate the same amount of space as the source virtual disk for the copy. Depending on the size of the source virtual disk, the space allocation may take several minutes to complete. However, you can allocate the required space before you create a snapclone, using a container, which is an empty virtual disk. Using this method is called creating a preallocated snapclone.
Creating a pre-allocated snapclone requires the following steps:
• Create the container.
• Clear the write cache.
• Attach the container to the source virtual disk.
When you create a container, you assign a name to it, select a disk group, and select a VRAID level and size. That space is then reserved until you are ready to create the snapclone. You can create multiple containers to have ready when you need them. Clearing the write cache means that you set the cache policy to "write-through" when you are ready to create the snapclone. This ensures that the controller writes data to both the cache and the physical disk while the host is writing data to the virtual disk. When you attach the container, you are copying the data from the source virtual disk to the container.
First step is to create a container
• Container can be in any disk group, even different from source virtual disk
• The container redundancy and disk group fixes those attributes for the snapclone
Notes: The initial understanding was that the selected container and the active virtual disk needed to be in the same disk group. This is a snapshot restriction (no support in Command View EVA V4.X) and not a snapclone restriction.
Creating the snapclone
• After selection of container, you get prompt for change of the write cache setting
• If not in write-through, cancel, change to write-through, and create the snapclone
Redundancy (not shown here) and disk group are determined by the container redundancy and location
Snapshot redundancy limitations
• Redundancy level of a snapshot depends on the parent virtual disk redundancy
• Snapshot must be an equal or lesser redundant VRAID type than the parent
– VRAID1 parent, valid snaps are VRAID1, VRAID5, and VRAID0
– VRAID5 parent, valid snaps are VRAID5 and VRAID0
– VRAID0 parent, valid snaps are VRAID0
• All snapshots of the same parent must be of the same VRAID level
– Example: For a VRAID5 parent, all snapshots must be VRAID5 or all snapshots must be VRAID0
• Command View EVA enforces the rules
• VRAID5 source virtual disk allows only VRAID5 or VRAID0 snapshots
Integrated logging facility data
• Limitation on first generation EVA
– Integrated logging facility (ILF) logging only on an ungrouped disk
– Drive should be new — never been used on an EVA, therefore no metadata
• Second generation EVA
– New Field Service page allows you to save ILF data as a file on the management server
• Because of long upload time, restrict the size of the ILF disks
• 36GB is maximum, but smaller (9–18GB) is better
– Storage system can be initialized or not
– If using a drive, same limitations as first generation EVA
Go to https://hostname:2381/command_view_eva/fieldservice Select the storage system, click Save ILF Log File.
0 comments
Post a Comment