
You should be able to:
+ Describe the management platform options for Command View EVA
+ List the hardware components of the Storage Management Appliance (SMA).
+ Describe the operating system of the SMA.
+ List the core software components and optional storage management applications of the SMA.
+ List the user names and passwords for the SMA, Web server and the Integrated Lights-Out port.
+ List the rules and limitations of Command View EVA.
For each EVA storage system, Command View EVA assists you with:
+ Initializing the storage system
+ Creating disk groups, virtual disks, snapshots, and snapclones
+ Adding hosts to a storage system
+ Monitoring existing virtual disks, physical disks, controllers, and host properties
+ Modifying these properties for different configurations
The media kit comes with separate CDs containing:
+ Command View EVA software
+ Command View EVA performance monitoring tool (EVAPerf)
+ Services tools (WEBES-SEA/ISEE and Navigator/SDC)
+ Documentation

You should be able to:
+ List the steps in the configuration process
+ Describe how to use Command View EVA to initiate and complete the configuration process steps
+ Identify the properties of disk groups and virtual disks
+ Describe how to create disk groups, virtual disks, hosts, snapshots, and snapclones
Configuring the storage system
Configuring the storage system and host requires a sequence of steps:
1. Gather preliminary information.
a. Develop a requirements list per server.
b. Create a list of all Fibre Channel adapters (FCAs).
c. Determine the Host World-Wide Name (WWN).
2. Perform a software code load (if necessary).
3. Initialize the storage system.
4. Perform a disk drive firmware code load (if necessary).
5. Create additional disk groups as necessary.
6. Install and configure hosts.
7. Create the hosts.
8. Create the virtual disks.
9. Create snapshots and snapclones.
Starting with the uninitialized storage system

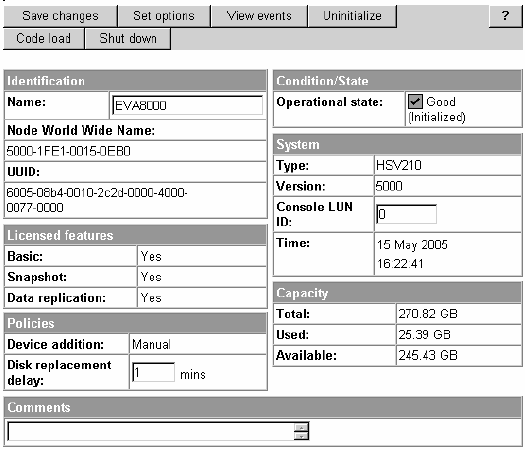
+ System Node World Wide Name — The node identifier for the system; a unique, 16-character hexadecimal number assigned to the system
+ System UUID (universal identifier) — Unique universal identifier for each object in the storage system, whether hardware element or software structure
+ Licensed features — Status of features that are enabled including basic, snapshot, and data replication
+ Operational state — The operational state of the HSV storage system, including good, attention, failed, and operation in progress
+ Version — System firmware version
+ Controller time — Usually set to the same time as the management appliance
The code load operation loads firmware files (.sss) to the appliance and then downloads the files to the EVA controllers and EMU.
The initialization process makes the EVA known to Command View EVA. Initialization binds the controllers together as an operational pair, establishing the preliminary data structures (metadata) on the disk array, and creates the default disk group.
Initializing an HSV storage system
To start the initialization wizard, click Initialize in the Content pane of the Uninitialized HSV Storage System Properties screen
After the initialization process completes, verify that the system is initialized by selecting the storage system name in the Navigation pane to display the Properties page.
Creating a disk group after initialization
You can create additional disk groups after you initialize the storage system if the default disk group does not contain all the disks in the array. The Disk Groups folder contains properties pages for all disk groups. When you select the folder, you see Default Disk Group, Ungrouped Disks, and disk groups names (if defined).

You can view and change disk group properties from the Disk Group Properties page for the default disk group or another disk group you created.
The disk group properties that you can be change are:
- Name
- Number of disks in a disk group
- Disk failure protection level
- Occupancy alarm level
- Comments

Number of disks: The number of disks assigned to the disk group. The default value is 8.
Disk failure protection level: A method by which the controller pair sets aside reserved capacity to take over the functionality of a failed or failing disk drive.
Disk groups allocate two spindles for single disk group protection and four spindles for double disk group protection.
The three levels are:
None — No failure protection is configured.
Single — Capacity of one physical disk is reserved.
Double — Capacity of two physical disks is reserved.
Occupancy alarm level: This value is the percentage of total disk capacity used. When the amount of data in the disk group reaches this level, an event code is generated on the SMA. The default value is 95%, however, the recommendation is to use no more than 90%.
Delete Disk Group: You cannot delete a disk group if it has virtual disks. You must first delete the virtual disks. You cannot delete the default disk group unless an additional disk group has been created to protect the metadata.
A vertical disk group configuration has one disk drive per shelf. This configuration is created automatically through VCS; however, it also can be done manually
Note: If the number of disks in the disk group exceeds the number of shelves, then there is a greater risk of failure.
Creating a virtual disk
A virtual disk is a simulated disk drive that the storage system HSV controllers create for hosts to use. The virtual disk characteristics defined by you or a storage administrator provide a specific combination of capacity, availability, performance, and accessibility. The controller pair simulates these characteristics by deploying the disk group specified for the virtual disk. The host sees the virtual disk like it would see a physical disk with the same characteristics.
Whenever you create a new virtual disk, a virtual disk family is automatically created. A virtual disk family initially consists of a virtual disk and its snapshot, if a snapshot exists. The original virtual disk is called the active disk. A snapshot cannot be an active disk. There is only one active disk per virtual disk family.
Note: The EVA supports dynamic online expansion of a virtual disk; that is, you can expand the capacity of a virtual disk without having to make the virtual disk unavailable to all hosts. This feature is only available for Microsoft Windows and Sun Solaris.
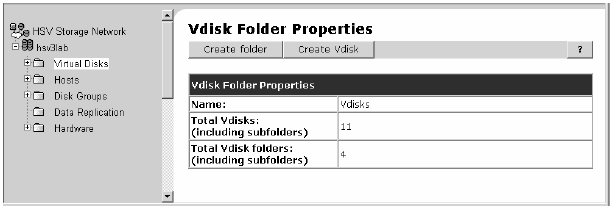
Creating a virtual disk folder
A virtual disk folder organizes the virtual disk families. Create it from the Vdisk Folder Properties page. Navigate to this page by selecting Virtual Disks from the group folder in the Navigation pane. The folder you create becomes a subfolder of the Virtual Disks folder.
Creating a virtual disk family
You can create a virtual disk family from the virtual disk folder properties page. Navigate to the Virtual Disk Folder Properties page by selecting the folder name in he Navigation pane.

Virtual disk characteristics
Specify characteristics as described in this table.

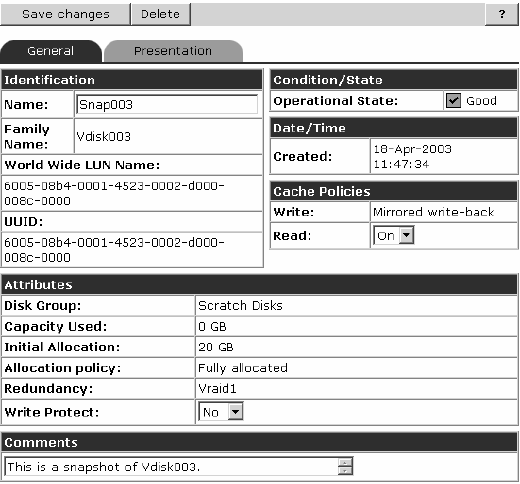
Vdisk Active Member Properties:
This example shows the properties of the active virtual disk in the virtual disk family Vdisk003. The General tab is selected.

Save changes — Save changes made on the properties page.
Create snapshot — Launch the wizard to create fully allocated and demandallocated snapshots.
Create Snapclone — Launch the wizard to create snapclones.

Creating a snapshot
A snapshot is a virtual disk that reflects the contents of another virtual disk at a particular point in time.
+ A snapshot operation can only be done on an active virtual disk.
+ Seven snapshots of an active virtual disk can exist at any time.
+ The active virtual disk and its snapshot constitute (cấu thành) a virtual disk family.
+ All snapshots within a virtual disk family must have the same allocation policy.
+ You cannot create a snapshot if a snapclone is in a copy state using the same active virtual disk.
+ A snapshot is intended to be temporary.
Start the Create a Vdisk Snapshot wizard at the Vdisk Active Member Properties page by clicking Create snapshot.
Create traditional snapshots or Virtually-Capacity Free snapshots by selecting one of the following allocation options from the drop-down menu:
+ Fully-allocated snapshot (Traditional Snapshot) — The space a virtual disk requires on the physical disks is reserved, even if the virtual disk is not currently using the space.
+ Demand-allocated snapshot (Virtually Capacity-Free Snapshot) — The space a capacity-free virtual disk requires on the physical disks is not reserved until needed.
Other characteristics default to the same values as the source virtual disk unless otherwise specified. These characteristics can be specified at creation of the virtual disk or later in the Properties page.
Virtual disk active properties page for snapshot:
Creating a snapclone
A snapclone is a copy of an active virtual disk. During the copy process, the following rules apply to the source virtual disk:
+ No other copy of the source virtual disk is in process.
+ You can create multiple snapclones as long as you have disk space.
+ You can create a snapclone in a different disk group.
+ The preferred path of the snapclone will be the same as the source virtual disk if you choose a preferred path.
Creating a pre-allocated snapclone requires the following steps:
1. Create the container.
2. Clear the write cache.
3. Attach the container to the source virtual disk.
Creating a Vdisk containers:
When you create a snapclone (a copy of a virtual disk), the first step is to allocate the same amount of space as the source virtual disk for the copy. Depending on the size of the source virtual disk, the space allocation may take several minutes to complete. However, you can allocate the required space before you create a
snapclone, using a container, which is an empty virtual disk. Using this method is called creating a pre-allocated snapclone.

Start the Create a Snapclone wizard at the Vdisk Active Member Properties page by clicking Create Snapclone.
To create a snapclone in the simplest way:
1. Enter a name.
2. Select a host.
3. Click Finish.
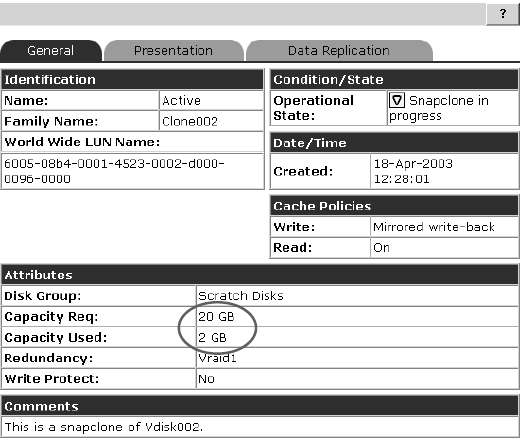
The following is an example of a snapclone properties page during the snapclone creation. Notice that the capacity required and the capacity used are different during the background process.
Write cache policy
Clearing the write cache means that you set the cache policy to writethrough when you are ready to create the snapclone. This ensures that the controller writes data to both the cache and the physical disk while the host is writing data to the virtual disk. When you attach the container, you are copying the data from the source virtual disk to the container.

Virtual disks with snapclones and snapshots The following is an example of a Navigation pane showing a snapclone and a snapshot.

0 comments
Post a Comment